Q294: How can I integrate Checkin24-7 with my Expedia Partner Central?

Sie sind hier: checkin24-7 » Hilfe » FAQ » Q294: How can I integrate Checkin24-7 with my Expedia Partner Central?
Introduction
If you have an account for your property at Expedia and you want to integrate it with Checkin24-7, you can use our Expedia Integration extension.
 
The extension will synchronize the availability between Checkin24-7 and Expedia. Availability of rooms in Expedia will be imported from the associated Checkin24-7 resources (see Potential issues below). On the other hand, all reservations made in Expedia by your customers will be exported with complete data to Checkin24-7 and will get a Checkin24-7 reservation ID. This way, you can have access to all reservations in one place, whether they were made in Expedia or in Checkin24-7. This also allows you to have only a part of your rooms assigned to Expedia while the rest is available to your customers only through your web site.
 
Turning on the Expedia integration
Before you can integrate your Expedia hotel with Checkin24-7, you need to apply for your hotel connectivity in Expedia first. There are two methods by which properties can be connected to Expedia via Checkin24-7:
1) Login to Expedia Partner Central. Next, navigate to the the Rates and Inventory tab and select Expedia Quick Connect Settings. Select Planyo from the list of supported vendors, select the Connectivity Options (AR, BR) and click on Submit.
2) or download this form and fill out the section 'Hotel Contacts and Details' with the information about your property. Please leave the prefilled Connectivity Interface Provider data in the second section untouched. When you are done, send the file by e-mail to eqchelp@expedia.com or by fax to +1 425 329 3648.
 
Once Expedia turns on your hotel connectivity with Planyo as the Interface Provider, you can continue with the setup process.
 
Checkin24-7 extension setup page
Once the Expedia Extension has been enabled by a Checkin24-7 support stuff, navigate to the Extension which you will find in your account. Then, click Go to the setup script to configure the integration.
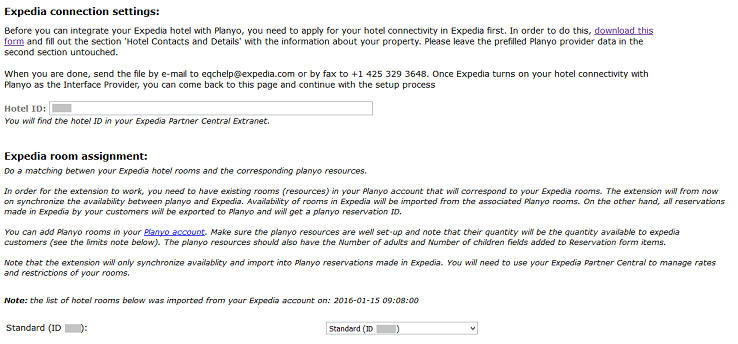
 
First of all, you need to specify your Expedia hotel ID so Checkin24-7 can access your property. Once this is done, the extension will download the list of your hotel rooms.
 
 
Room assignment
Now, you need to do a matching between your Expedia hotel rooms corresponding Checkin24-7 resources.
 
In order for the extension to work, you need to have existing rooms (resources) in your Checkin24-7 account that will correspond to your Expedia rooms. The extension will synchronize availability between Checkin24-7 and Expedia. Availability of rooms in Expedia will be imported from the associated Checkin24-7 rooms. On the other hand, all reservations made in Expedia by your customers will be exported with complete data to Checkin24-7 and will get a planyo reservation ID.
 
You can add Checkin24-7 rooms in your account. Make sure the Checkin24-7 resources are well set-up and note that their quantity will be the quantity available to Expedia customers (you can use the Max availability limits feature to easily change the number of rooms available in Expedia; you will learn more about this later in the tutorial). The Checkin24-7 resources should also have the max. number of persons specified for each room.
 
Once finished, click Continue to accept the settings.
 
Setting up availability limits
Now, you need to initially upload availability for your hotel rooms. Expedia requires that you have availability for next 12 months uploaded for your property. You can start the initial upload by clicking Upload availability on the setup page.
 
Before you do this step you can set up the maximum number of rooms that you want to be available to Expedia.
 
In order to set the availability limits, click Availability limits. At the top of the page, you can switch between your Expedia rooms to change their settings.
 
 
By specifying a maximum availability limit, you can limit the room's availability in Expedia for chosen days, compared to the total quantity set in Checkin24-7. The Max number of rooms available in Expedia (default) value applies to all reservation dates. Additionally, you can also modify the value up or down for individual days. If you don't specify any limits, either default or on specific days, the availability will simply depend on the resource's availability in Checkin24-7.
 
For example, let's say the quantity defined for a room in Checkin24-7 is 25 but you want to give to Expedia only 10 of the rooms. This way, customers reserving on Expedia will be able to take only 10 rooms while the rest can be reserved from your web site.
In this case, you need to set the Max number of rooms available in Expedia (default) value for the room to 10. Click Default limit, type 10 as the default limit and click Update. This way, availability uploaded to Expedia for the room will never be higher then 10.
 
Let's say that you additionally want to increase the maximum availability for the room for dates between 20th and 31st December to 15. Simply click the link for December in the Max Availability Limits section, select 15 from the drop-down list for the days and click Update.
 
Note that the values define the maximum availability that will be uploaded to Expedia. If you limit the availability of the corresponding resource in Checkin24-7, e.g. by adding vacations, the number of rooms available to Expedia can be even smaller.
 
The same way, you should setup the limits also for other rooms if necessary. Note that you can switch between the rooms by using the drop-down list at the top of the Max. availability limits page.
 
Note: Some hotels have base availability amount established for their rooms in Expedia. This is the amount assigned to Expedia that cannot be taken back. In such case availability uploaded to Expedia for the room should never be smaller then the established base amount (with regard to any bookings already made). In such case, Expedia will automatically fix the uploaded value to the base amount.
 
Setting up rates and restrictions
Note that this extension will only synchronize availablity and import reservations made in Expedia. In order to set up the rates and reservation restrictions for your rooms you will need to use Expedia Partner Central (EPC). EPC supports robust ways for bulk update of prices and restrictions. EPC allows you to set rates and restriction for a range of dates as well as for single days.
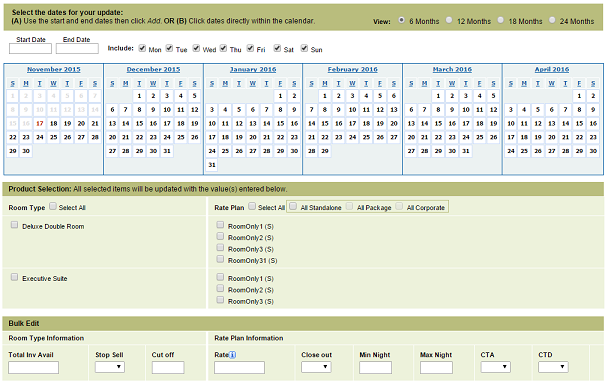
 
In order to update a range of dates, choose Rates and Inventory > Bulk update from the main menu.
 
 
On the page, you can either specify the start and end dates that you want to update or use the calendar preview to select individual days. Next, in the section below you can choose if you want to update a rate or once of the restriction. Once you submit the changes, the data will be updated for your rooms.
 
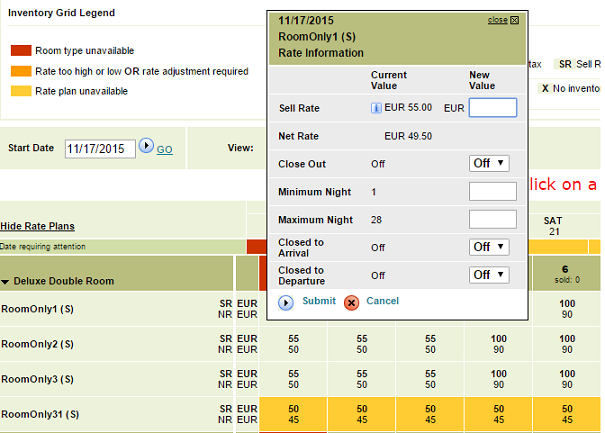
You can also change rates and restriction for individual days directly on the Inventory Grid page. Once you click a cell, a pop-up window appears where you can modify the data.
 
 
Upload of availability
Now that all is set up, you can upload the data to Expedia. Go back to the Setup page and click [Upload availability]. Once the update is finished, you can go to your Expedia PartnerCentral and check that everything is uploaded correctly. Note that this initial data upload needs to be done only once. From now on, all changes to availability will be updated on your Expedia account automatically (see Potential issues below).
 
 
Updates of availability
If you want to modify availability limits for one of your rooms, you can always do this on the Max. availability limits page. Once you submit the changes, the extension will automatically update the data on your Expedia account.
 
Note that availability can also be modified as the result of changes made on your Checkin24-7 account. In such case, the related data will be automatically updated on your Expedia account as well (see the note below). For example, if you modify in Checkin24-7 a vacation of a resource assigned to one of your hotel rooms, the corresponding Expedia room's availability will be updated as well.
 
Note: modifications of vacations made through Checkin24-7 API (if you use one) will not cause automatic update of availability. In such case, you may need to update availability manually by choosing Manual data update on the setup page.
 
Downloading reservations
When a reservation is made by a customer on Expedia, it will be automatically imported into Checkin24-7 and visible among other reservations in your Checkin24-7 administration panel.
 
On the reservation's details page, you can view all information related to Expedia. This includes the due commission, guest name, smoking preferences as entered by the customer, their notes and special requests about the visit and all other details.
 
Note: that though the Checkin24-7 view allows making modifications to the reservation, this shouldn't be used for Expedia reservations. Whenever a customer is making a reservation at Expedia, they are sent a link where they can change the reservation's details. This includes changing arrival and departure dates, modifying number of persons or even rates. The changes will be automatically updated and visible in Checkin24-7.
 
Any modifications to the reservation made in the Checkin24-7 administrative panel will not be reflected in any way in Expedia. For example, if you cancel the reservation in Checkin24-7, it will be still visible as valid in Expedia and all due commissions and fees will have to be paid to Expedia anyway.
 
Note: Because of security reasons, details of a credit card or Expedia virtual card used by the customer during reservation is not available in Checkin24-7. In order to view the credit card details, you need to go to your Expedia Partner Central
 
Expedia PartnerCentral
Expedia Partner Central (EPC) is the place that includes direct access for you to manage rates, financial details and processes, detailed information about your property as well as a number of other tools. In EPC you can view detailed information about your reservations, including credit card or Expedia virtual card data. It also provides you with reservation statistics and accounting information.
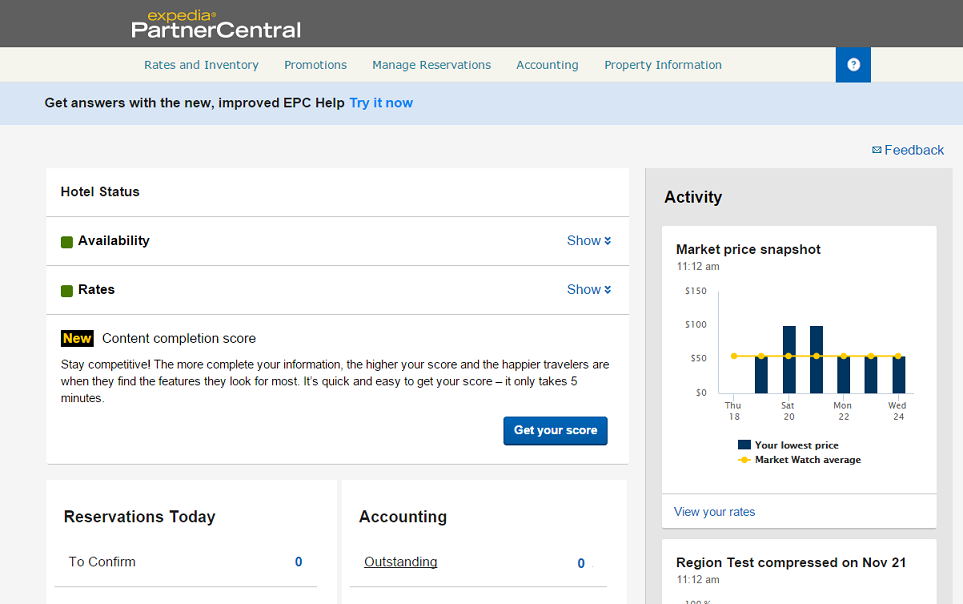
 
You can always visit your Expedia Partner Central to verify that the data uploaded by the extension for your hotel rooms is correct.
 
 
Potential issues
There are some issues that you should be aware of when running synchronization between Expedia and Checkin24-7.
Base availability amount
Some hotels have base availability amount established for their rooms in Expedia. This is the amount assigned to Expedia that cannot be taken back. In such case availability uploaded to Expedia for the room should never be smaller then the established base amount (with regard to any bookings already made). Our extension is not able to set the availability for such rooms below the contracted base availability (of course unless a reservation was made through Expedia). In such case, Expedia will automatically fix the uploaded value accordingly with the established base amount. This in some cases can lead to overbooking.
This means that you should offer through Checkin24-7 only this number of rooms, that is not contracted with Expedia. For example, if you have 5 Double rooms set up in Checkin24-7 and you have contracted 2 of them with Expedia, you should offer through your Checkin24-7 web site only 3 such rooms. You can set it up by using packages. You can create a package containing the Double room, give it the quantity of 3 and offer it through Checkin24-7. This way, your customers will be able to book all 5 rooms through Expedia but only up to 3 through your Checkin24-7 site.
Resource quantity options
As mentioned, the extension will synchronize the availability between Checkin24-7 and Expedia. When there is a new reservation added in Checkin24-7 or when you enter a new vacation, the availability will be automatically updated in Expedia.
On the other hand, if you change any configuration options in Checkin24-7 that could affect quantity of a given resource, please update availability of the assigned Expedia room manually. You can do this on the [Manual data update] page in the extension.
The configuration options that could affect quantity of a resource can be the quantity value itself but also e.g. package options (when using packages).