
Q317: HOW DO I SETUP MY STRIPE ACCOUNT TO ACCEPT PAYMENTS THROUGH CHECKOUT?
Ti trovi qui: checkin24-7 » Aiuto » Domande frequenti » Q317: HOW DO I SETUP MY STRIPE ACCOUNT TO ACCEPT PAYMENTS THROUGH CHECKOUT?
For general information about accepting payments in Checkin24-7 see Q121: I'd like to accept credit card payments for the reservations.
First, select Stripe Checkout in the Payment processing site option on the site settings page.
In the next field, enter your Stripe API secret key followed by slash, by your API publishable key, by another slash and webhook secret (see the Webhook section below). For example:
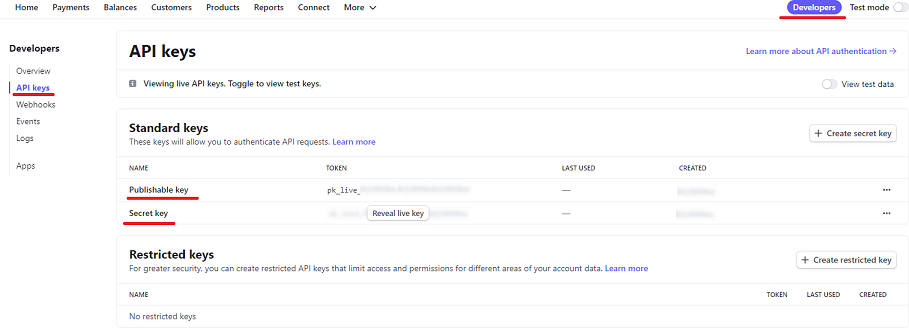
You can find the API credentials in your Stripe Dashboard, in the API section:
For test transactions, you should enter the test API secret and publishable key. Note that the test credentials start with sk_test_.... and pk_test_.... Make sure to change the credentials to production values when want to start receiving real payments.
Optionally, you can add another slash and enter comma-separated switches to customize the payment process. Type 'email' to prefill the customer's email address field in the Stripe form with the address entered in Checkin24-7. Note that when the address is prefilled, Stripe doesn't allow to change it anymore on their website. Without this option, no email address will be passed to Stripe and the customer will be able to enter their email address during the payment process.
Another switch is 'billing-address'. This tells Stripe Checkout to collect the customer's billing address.
In addition to standard credit card transactions, Checkout also supports other payment methods you offer to your clients. This includes giropay, eps and bancontact. Note that before selecting any of them in Checkin24-7 you have to activate them in your Stripe dashboard first. Also, they will work only when your Checkin24-7 site uses the euro currency.
Webhook
You need to set up a Stripe webhook pointing to a script in our system. This way we will receive updates on your transactions and add payment information to your Checkin24-7 reservations.
You can set up the webhook in the Webhooks section of your Stripe Dashboard:

When you click Add endpoint, a pop-up window appears where you can enter the webhook settings.
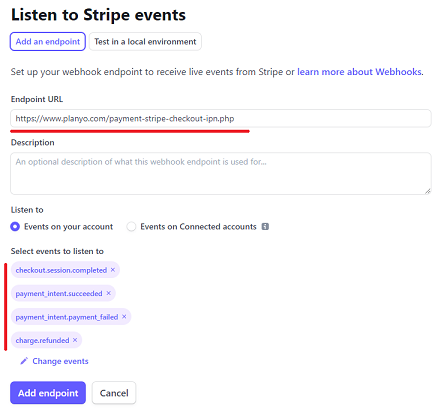
In the Endpoint URL field enter: https://checkin24-7.com/payment-stripe-checkout-ipn.php
In the Events to send section, add the following events: checkout.session.completed, payment_intent.succeeded, payment_intent.payment_failed and charge.refunded.
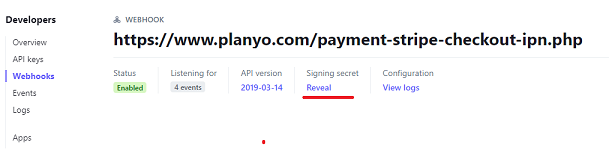
Once you click the Add endpoint button to submit the settings, the Signing secret section appears below Webhook details (see the picture below). Click the Click to reveal button to see the webhook secret and copy the value.
Next, go back to the Online payments page in your Checkin24-7 panel. Go to the Stripe secret key / publishable key / webhook secret field and enter the webhook secret as the third value. The webhook secret is necessary for authenticating events coming from Stripe to our system.
Which Stripe integration should I choose? Show
In the next field, enter your Stripe API secret key followed by slash, by your API publishable key, by another slash and webhook secret (see the Webhook section below). For example:
sk_live_BQokikJOvBiI2HlWgH4olfQ2 / pk_live_6pRNASCoBOKtIshFeQd4XMUh / whsec_Yq3Tc6fP4556XLdfgM9WHmjmo1r2
You can find the API credentials in your Stripe Dashboard, in the API section:
For test transactions, you should enter the test API secret and publishable key. Note that the test credentials start with sk_test_.... and pk_test_.... Make sure to change the credentials to production values when want to start receiving real payments.
Optionally, you can add another slash and enter comma-separated switches to customize the payment process. Type 'email' to prefill the customer's email address field in the Stripe form with the address entered in Checkin24-7. Note that when the address is prefilled, Stripe doesn't allow to change it anymore on their website. Without this option, no email address will be passed to Stripe and the customer will be able to enter their email address during the payment process.
Another switch is 'billing-address'. This tells Stripe Checkout to collect the customer's billing address.
sk_live_BQokikJOvBiI2HlWgH4olfQ2 / pk_live_6pRNASCoBOKtIshFeQd4XMUh / whsec_Yq3Tc6fP4556XLdfgM9WHmjmo1r2 / email,billing-address
In addition to standard credit card transactions, Checkout also supports other payment methods you offer to your clients. This includes giropay, eps and bancontact. Note that before selecting any of them in Checkin24-7 you have to activate them in your Stripe dashboard first. Also, they will work only when your Checkin24-7 site uses the euro currency.
Webhook
You need to set up a Stripe webhook pointing to a script in our system. This way we will receive updates on your transactions and add payment information to your Checkin24-7 reservations.
You can set up the webhook in the Webhooks section of your Stripe Dashboard:
When you click Add endpoint, a pop-up window appears where you can enter the webhook settings.
In the Endpoint URL field enter: https://checkin24-7.com/payment-stripe-checkout-ipn.php
In the Events to send section, add the following events: checkout.session.completed, payment_intent.succeeded, payment_intent.payment_failed and charge.refunded.
Once you click the Add endpoint button to submit the settings, the Signing secret section appears below Webhook details (see the picture below). Click the Click to reveal button to see the webhook secret and copy the value.
Next, go back to the Online payments page in your Checkin24-7 panel. Go to the Stripe secret key / publishable key / webhook secret field and enter the webhook secret as the third value. The webhook secret is necessary for authenticating events coming from Stripe to our system.
Note:
Stripe Checkout requires that your Stripe Account has the name set up in Dashboard. Go to your Stripe admin panel and make sure your account has a name specified in the top-left corener of the page.